 |
| What's Hot! | Products/ Tools | EFI Tuning | Basic Tuning | Advanced Tuning | Chassis Tuning | Advertise with us |
CATEGORIES FOR ARTICLE LINKS BELOW
![]()
DOT Help |
How To Perform a Coolant Flush/ Changing Your Radiator Fluid
Guide to properly remove coolant and flush radiator and heater core
Contributed by: Enginebasics.com
A reader recently asked us to do an article on the proper way to flush their cars engine coolant. Flushing a cars engine coolant should be considered an important item to go along with any routine maintenance that is performed on a vehicle. Radiator fluid, often referred to as automotive coolant, is what protects a car engine from overheating. Internal combustion engines produce massive amounts of heat, which is left un checked, will eventually cause the engine to get hot enough to ruin itself. This is even truer today, as many engines have moved to full aluminum blocks and heads. While lighter, aluminum is also more susceptible to heat causing it to distort and change its shape if heated too much. Because of this, a cars cooling system has become much more important and needs to be functioning 100% to maintain proper temperatures.
Step 1 to changing/flushing a cars radiator fluid
The first step is to lift the car. Most cars will have a shroud or under carriage cover that must be removed to expose the front area of the vehicle. Once this is removed you should be able to see the bottom of the engine as well as the radiator located in the front of the engine. On the bottom of most radiators is a small plug that can be pulled to allow coolant to be drained. Some vehicles radiators don’t have a drain plug and in those instances you can remove the lower radiator hose to drain fluid as well. Make sure to have a bucket or container ready to catch the radiator fluid. It helps if the vehicle is lowered back down in the front and the vehicle jacked up in the rear to try and get even more of the fluid to drain. Also having the heater on, which opens up the passages to the heater core located in the cabin of the car, can help to get all the coolant out.
Step 2 Flushing the system
Once all of the radiator fluid has drained from the car/truck, you can now flush the system if you’re looking to get everything out and fresh fluid in. One of the easiest ways of doing this is with distilled water.
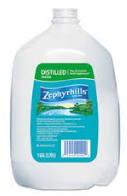
Distilled water is best to use instead of just tap water from a hose or your sink so that you don’t introduce minerals into the system. Minerals or other contaminants can cause the radiator to loose efficiency, and can also hinder in the heat transfer process of the block and heads of the engine. Distilled water is cheap. You can usually find it sold by the gallon at any grocery store for around .99 cents each. Pick up $5 dollars worth and you should be good to go. Close the drain valve or reattach the lower radiator hose and lower the vehicle back down in the back if you had jacked it up to help drain the coolant. Now jack up the front of the car to make sure that the radiator or fill location is the highest point on the car.
Fill the vehicle with the distilled water with the heat selector in the cabin moved over to “heat” so that the header core is flushed as well. Once the car/ truck radiator is full, squeeze the upper and lower radiator hoses to try and force some of the fluid to move around in the engine and hopefully migrate some of the air bubbles trapped in the coolant passages to rise up out to the fill location. Once you can’t fill any more distilled water into the radiator, you will now lower the front of the car back down and drain everything back out.
This should now have completely flushed the system and it should be ready for fresh coolant.
Step 3 putting in new radiator fluid
For this step, like before, we will raise the front of the vehicle as high as we can so that the fill point is as high as possible. We will then fill the car/truck with a 50/50 mix of distilled water and radiator fluid. Most radiator fluid can be purchased “pre-mixed” so that all the owner has to do is pour it is. Some manufacturers like BMW, and Mercedes require specific radiator fluid for their cars. While many believe this is just a method of selling really expensive coolant to the owner for a large profit, some caution should be used to make sure before pouring in a universal product.
Once again you will fill the radiator till it is full and all of the air has been burped out of the system.
Step 4 Removing all the air from the coolant (burping the radiator)
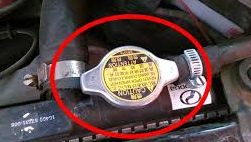
Once you have filled the radiator as high as it will go and squeezed the upper and lower radiator hoses a few times, we now need to start the vehicle and let it warm all the way up with the radiator cap still removed. As the car/truck gets fully up to temperature (around 180 degrees Fahrenheit) the thermostat will open and coolant will begin to flow around the engine because of the water pump. This will help any additional trapped air to be removed from the system and exit at the radiator cap that you still have open. At this point you will probably notice that the coolant has gone down and that you are able to add more to the system. Once filled again, you can close the radiators cap and shut the car off. You are now done assuming you removed all the air from the system.
ATTENTION: For cars equipped with self-bleeding coolant reservoirs.
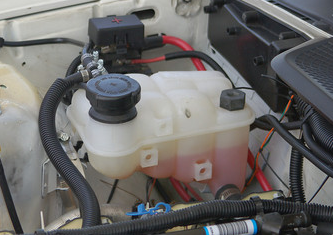
Many german cars like VW, Audi, BMW, Mercedes to name a few, are equipped with a coolant reservoir where you fill the system with fluid. You will notice that the radiator cap is located here, instead of on top of the radiator itself. These system are nice in that they will remove air from the system themselves. To properly bleed these types of systems after a drain you would:
1. Fill the system with fluid to the line marked “MAX” on the side of the coolant expansion tank.
2. Start the vehicle with it level on the ground
3. Allow vehicle to fully warm up to operating temperature.
4. As vehicle is running and warming up, continue to add fluid into the expansion tank keeping it above the “MIN” line marked on the side of the coolant expansion tank.
And that does it. Hopefully the changing of your cars coolant goes well and if you flush the system, that you notice a good improvement in cooling afterward.
Be sure to check out our other articles here at enginebasics.com. Contact us if you have any questions or have a request for something we haven’t written about.
ATTENTION READER:
If you enjoyed the information and article you just read be sure to check out our newly released book with even more exciting photo's and information:How to Turbocharge and Tune your Engine
Want to know more about your particular Make and Model vehicle? All of these vehicles are covered in the tech, maintenance and repair articles found above. Enginebasics is the wiki or wikipedia of car part, repair, how to and tuning information. Let us be the class 101 for your automotive learning.
| Ford | General Motors GM | Pontiac | Jaguar | Land Rover | Nissan |
| Toyota | Honda | Lexus | Acura | Lotus | Scion |
| Infinity | BMW | Mercedes | Mitsubishi | Ferrari | Maserati |
| Lamborghini | Volks Wagen VW | Saab | Audi | Hyundai | Kia |
| Subaru | Mazda | Chevy | Volvo | Caddilac | Dodge |
| Chrylser | Daewoo | Porsche | Mercury | Freightliner | MG |
Individual Models
| Ford Mustang | Mitsubishi Eclipse | Mitsubishi Evo | Subaru WRX / STI | Dodge Viper | Chevrolet Corvette |
| Nissan Skyline | Honda S2000 | Nissan 350z | Toyota Supra | Chevy Camaro | Lotus Elise Exige |
| Honda Civic | VW Golf | Dodge SRT-4 | Eagle Talon | Acura Integra | BMW M3 |
| Nissan 240sx | Porsche 911 | Acura NSX | Honda Accord | Toyota Camry | Toyota MR2 |
| VW R32 | Dodge Truck | Mazda Rx7 | VW Jetta | Sand Buggy | Nissan Sentra |
For the latest Automotive news and stories visit the websites below |


Our feature Build: An AWD V6 Civic